Preparing Vehicle Templates in Adobe Illustrator and Adobe Photoshop
(Note: When preparing this procedure, Adobe Illustrator CS and Adobe PhotoShop CS were used. However, the steps should be similar for other versions of these products.)
Inital Setup
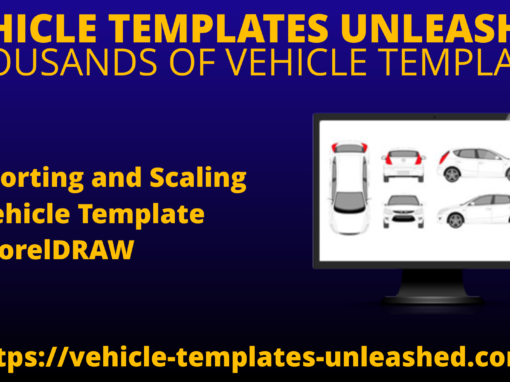
We want to start by importing and scaling the template, and creating two extra Layers that will help us when editing.
- Import the vehicle template (*.ai) into Illustrator.
- In the Layers palette, click Create New Layer, and rename the layer as “Bumpers/Tires.”
- Click Create New Layer again, and rename the layer as “Body Outline.”
- Go Select menu >> All.
- Go Object menu >> Transform >> Scale.
- Set the scaling amount according to the ratio that is easiest for you to work with (see Scaling Notes, below).
- For the entire selection, apply a black stroke of 1 pt. thickness.
Scaling Notes
All templates are 1:20 scale. It is often useful to partially scale the template in your design package, and then scale the remaining amount when printing.
There are two common ways that this scaling can be applied:
Scale the template by 200%, and then output the finished design at 1,000% for a combined scaling of 2,000%. This gives us an 1 inch = ten inches ratio when designing.
Scale the template by 166.666%, and then output the finished design at 1,200% for a combined scaling of 2,000%. This gives us an 1 inch = 1 foot ratio when designing.
Isolate the vehicle body
For our vehicle template, we want to identify the sides that we want, and then use the following steps to prepare that side. Note that these steps can be repeated for each vehicle side, and our example will focus on the rear view.
- Using the Direct Selection Tool (A) select the body outline.
- Go Object menu >> Group.
- Go Edit menu >> Copy.
- Go Edit menu >> Paste in Front.
- In the Layers palette, expand the Layer 1 entry.
- A blue dot to the right of the next entry represents the currently selected object (i.e., the body outline).
- Click and drag the blue dot up onto the Body Outline layer. This will move the selected object between layers.
- The selected item will now be on the Body Outline layer, and the selected item dot should now be green.
- For the body outline that you just moved, set its Fill color to None.
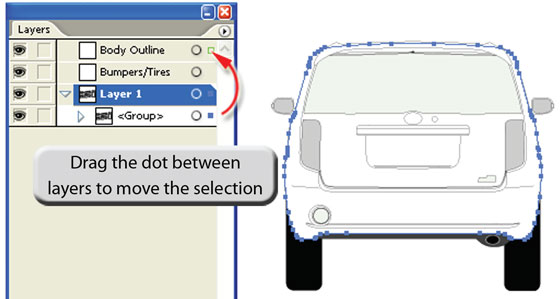
In Adobe Illustrator, there can be multiple objects on each layer. For a selected object, drag the dot between layers to move that object to the new layer.
Isolate the bumpers and tires
We now want to move the bumper and tire elements onto their own layer, such that we can clip them against the body outline.
- Using the Direct Selection Tool (A), select all of the bumper and tire lines. If you have trouble making selections, then select most of them now and proceed to the next step.
- In the Layers palette, drag the “selected item” dot from Layer 1 to the Bumper/Tires layer.
- Repeat steps (1) and (2) until all the bumper and tire lines have been moved.
In the Bumpers/Tires layer, click the “eye” to turn OFF the visibility. By hiding the lines that you’ve moved to this layer, it allows you to spot anything that you have overlooked.
Clip to the body outline
Now that the bumper and tire elements are on their own layer, move the body outline object to the “top” and trim the bumpers and tires.
- Select the Body Outline object (see Fig. 2).
- Go Object menu >> Arrange >> Bring to Front.
- Go Object menu >> Path >> Divide Objects Below( i.e., trim the bumper and tire objects.)
- Using the Direct Selection Tool, select and delete the bumper and tire portions that fall within the body outline.

In the Layers palette, click the circular button to select all the objects that are on that layer.
Create bounding box
We now want to create a rectangular bounding box around the vehicle side that we just finished editing.
- Turn on the grid lines (View menu >> Show Grid).
- Turn on snap to grid (View menu >> Snap to Grid).
- Choose the Rectangle Tool and draw a bounding box around the vehicle side rounding up the nearest half-inch.
If need be, draw a rectangle, and choose the Selection Tool (V) to resize/reposition the rectangle.
Bring the design into Adobe Photoshop
At this point, you have completed the editing for one side of the vehicle template. Repeat the above steps for the remaining vehicle sides that you need. When all sides have been completed, use the following steps to bring the design into Photoshop.
- Using the Direct Selection Tool, select a given side of the vehicle and its bounding box.
- Go Edit menu >> Copy.
- Go Edit menu >> Paste (i.e., paste a duplicate within Illustrator).
- With the duplicate still selected, go Edit menu >> Copy.
- Launch Photoshop, and go File >> New.
- For the new file, set its Resolution = 720 pixels/inch, and Background Contents = Transparent.
- Go Edit menu >> Paste.
- In the Paste dialog, choose Pixels.
- Along the top of the PhotoShop window, click the checkmark to accept placement of the pasted design.
Create layers
As in Illustrator, we want to create PhotoShop layers that will make editing easier.
- In the Layers palette, rename Layer 1 to Vehicle.
- Choose Create New Layer, and rename the layer as Artwork.
- Choose Create New Layer again, and rename the layer as White.
- Select the Vehicle layer.
- Choose the Magic Wand Tool (W).
- Click outside the vehicle body to select the region that surrounds the vehicle.
- Select the White layer.
- Choose the Paint Bucket Tool (G) and flood fill with white.
- In the Layers palette, click the Lock All button to lock the White layer.
- Likewise, select the Vehicle layer and click the Lock All button to lock the Vehicle layer.
- The Artwork layer will be the layer for adding artwork, such that the artwork appears above the Vehicle layer.
Further things to do
At this point, you are ready to begin adding artwork and text to your design. Here are some thoughts to consider:
At the current print dimensions, you can print a professional-looking proof for the customer to sign. Just remember that you will need to scale up before printing and/or cutting the finished job.
Add artwork to the Artwork layer. You can create additional layers, so long as they are between the Vehicle and White layers.
Add guides to use for positioning of artwork, which can be printed on the proof to serve as a schematic. In particular, make note of keyholes, handles, lights, decals, etc.
When sending output from PhotoShop, either scale the design within PhotoShop, or set scaling within the printer driver (See Scaling Notes on page 1).
When scaling designs for print, make sure that the page size has been set large enough to accommodate the scaled job. This would be set within the printer driver.
Purchase Subscription
-
Car n Truck Vehicle Outline Collection - One Year Subscription
$199.00Successfully Added to your Shopping CartAdding to Cart... -
Car n Truck Vehicle Outline Collection - Lifetime Subscription
$599.00Successfully Added to your Shopping CartAdding to Cart... -
Car n Truck Vehicle Outline Collection - One Month Subscription
$49.00Successfully Added to your Shopping CartAdding to Cart...


All Vehicle Template Tutorials